
When there are endless projects and it feels as though you are drowning in things to do, it can be helpful to get things on paper to give some direction and clarity.
We recently moved from town to a new property in the country with a lot more space. This means that we have lots of ideas for a larger garden, fruit trees/bushes, chickens, outdoor entertainment, updating parts of the house and shop, and more. However, it quickly became very overwhelming with all the things we wanted to add or update.
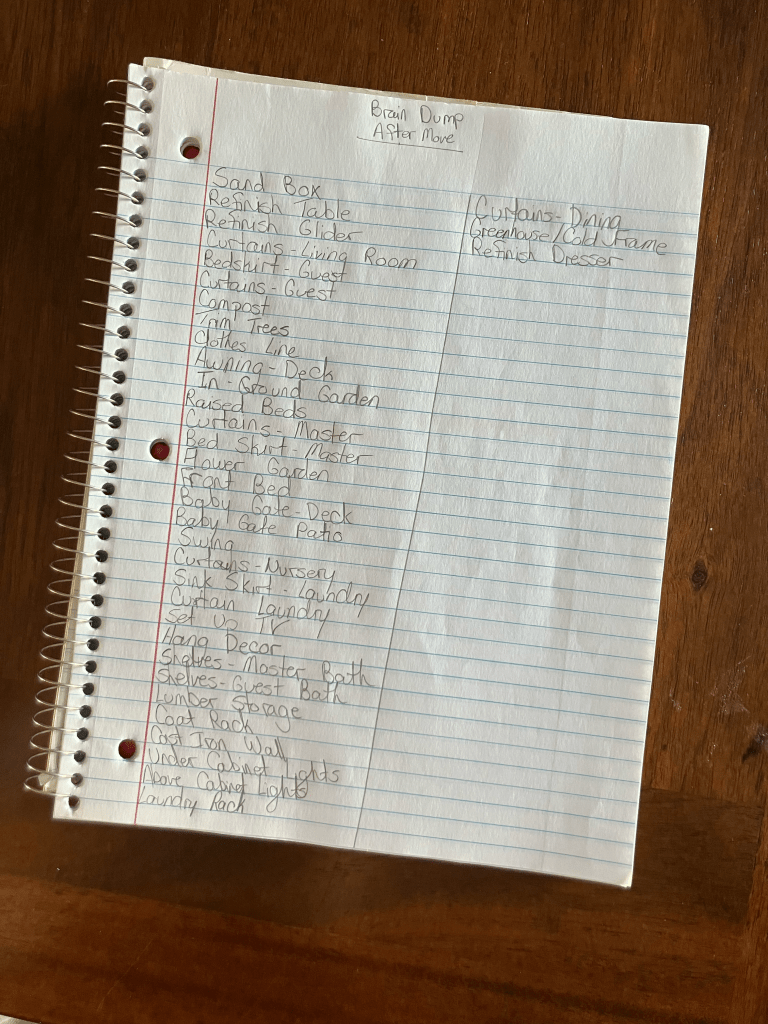
To help fight the overwhelm and keep us organized and on task, my husband and I sat down together to brain dump all the projects that we would like to do over the next couple of months or even years. We wrote down everything, no matter how big or small, so that we have a “master list” of projects.
This master list is far from complete because we keep adding to the list as spend more time living life on this property, but it gives us a place to dump all our ideas to help ditch the overwhelm. Not only that, it gives a place to go when we have time but don’t know what to work on next.
Step 1: Brain Dump Your Ideas
This step can sometimes be the hardest, especially if you have a habit of censoring your own ideas and creativity. Don’t hold back when you have ideas, just put them on paper. Completely empty your brain even if some of the ideas seem crazy or unattainable. You can evaluate your ideas later to see if they are feasible, you simply want to create space for yourself to get creative and focus on the project you are working on currently.
This step can be for a particular season (new home, holiday to-do list, party planning, etc.) or it can be something that you do to give yourself direction every day, week, or month.
The goal of this step is to get all the clutter out of your brain so that you can focus on the project you are currently tackling. This list doesn’t need to be pretty, organized, or only have projects that are completely planned out because the organizing and planning steps will come later. In fact, it is often better if it isn’t because then you are truly focusing on getting everything out and on paper rather than how neat and organized things look.
Step 2: Organize Your Master List
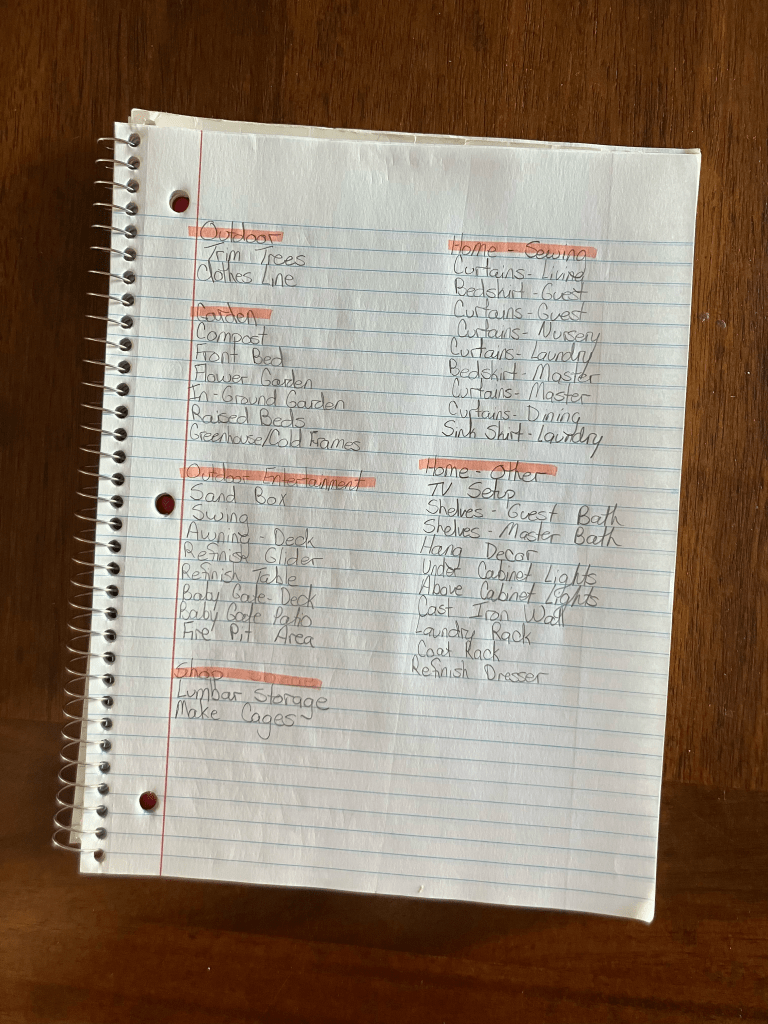
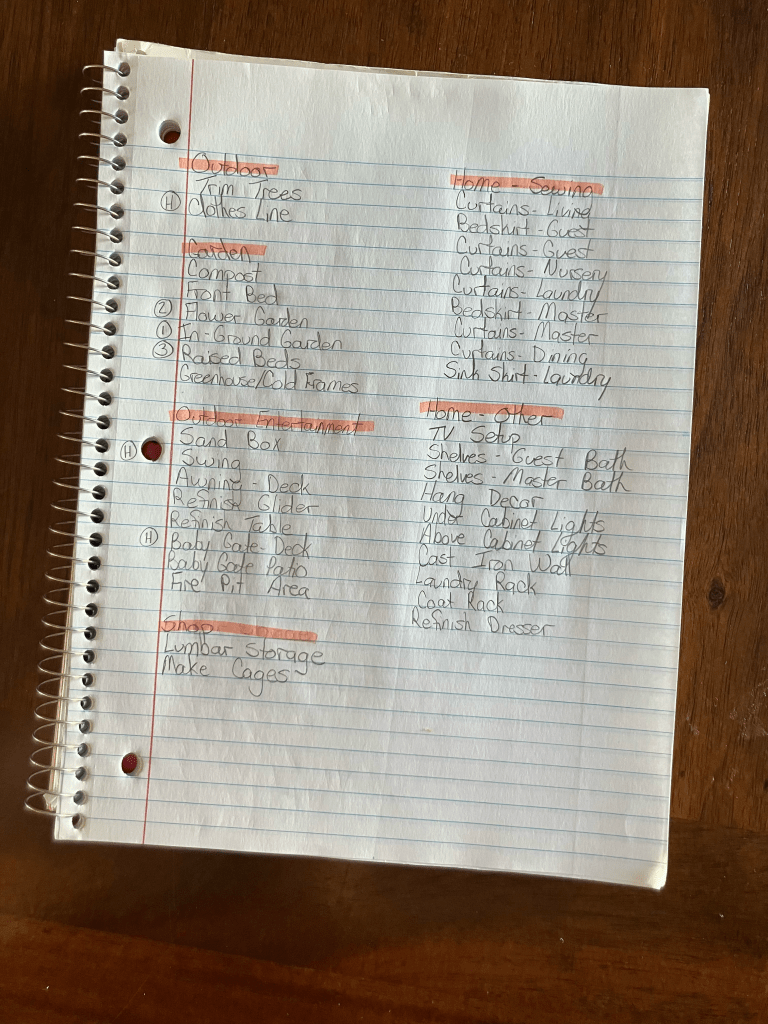
This is where you give your thoughts some direction. Often it can be helpful to group the different projects or to-do items into general overarching categories (priority rankings, area of the home or property, by person, etc.).
You can organize your projects in whichever way makes the most sense for you. I like to organize our list of things to do around our new property by area which generally means they are already sorted by person. For example, we have home, shop, garden, and entertainment categories. These categories help us know who has main responsibility for a project because my husband is usually the dreamer for most of the things in the shop and outside, while I am the dreamer for the house and garden.
Having a perfectly organized list at this point isn’t necessary, you just want to make it so that you can easily scan through your projects as you make your final to do list. None of our lists have projects in any specific order and very few if any have complete plans as to how they will be finished yet. In fact, some don’t even have a rough plan outside of knowing that we want to add or update that area.
For example, we know we want a place to put our firepit, but we haven’t mapped out exactly where that will be or what it will look like just yet. However, that is just fine at this stage!
Step 3: Prioritize Your Top Projects
Now it’s time to get the top items singled out. Not everything can be a priority or else nothing is actually a priority, so its time to pull the top 2-4 projects that are most important.
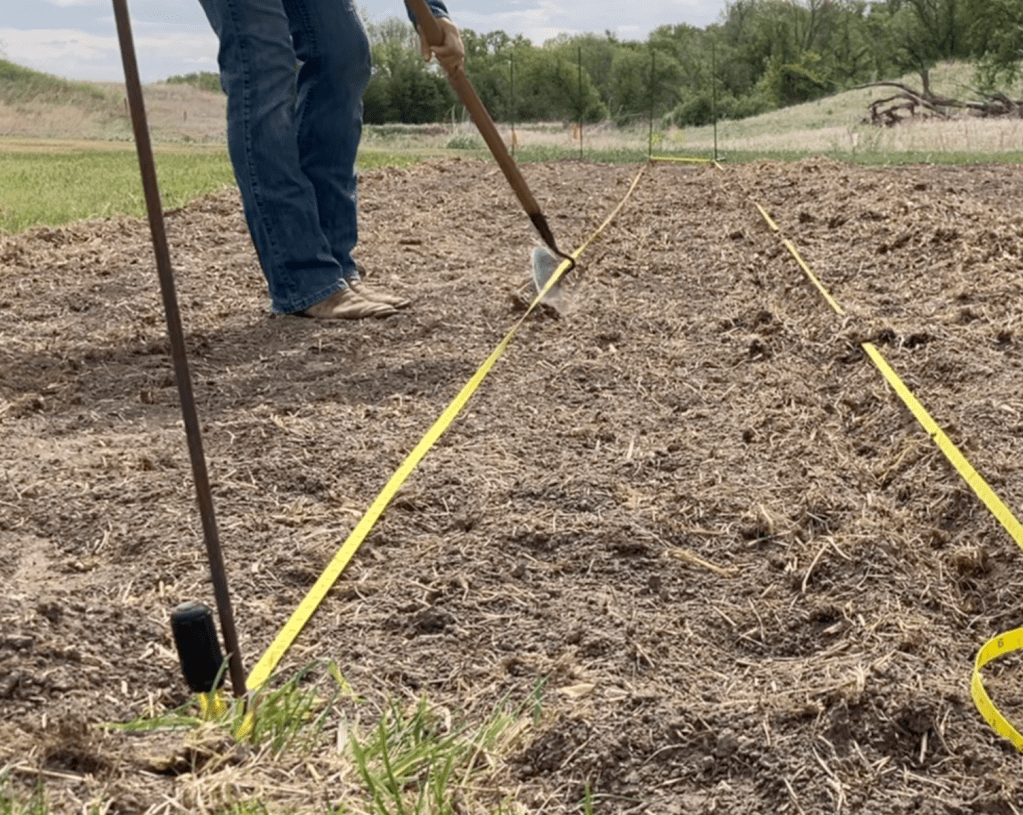
In my experience, it works best to pick fewer items if they are big projects that are daunting and time consuming. For example, I need to get my new garden mapped out and in the ground, and I need to prepare the cut flower beds (remove current plants, prepare the ground for new flowers, and plant). However, those seem like a huge tasks to tackle with lots of smaller projects within them, so those two projects are all I will put on my list for now.
If my list had small, one step or few step projects like mowing the lawn, cleaning the bathroom, baking bread, and buying groceries; I would put all four on my list. These are all things I have “mastered” in the sense that I know exactly what I am doing and don’t need a lot of time to complete them.
Step 4: Plan Complex Projects
This step isn’t always necessary if you have smaller projects that are one-step, but it can be very helpful if you are working on a larger more complicated project.
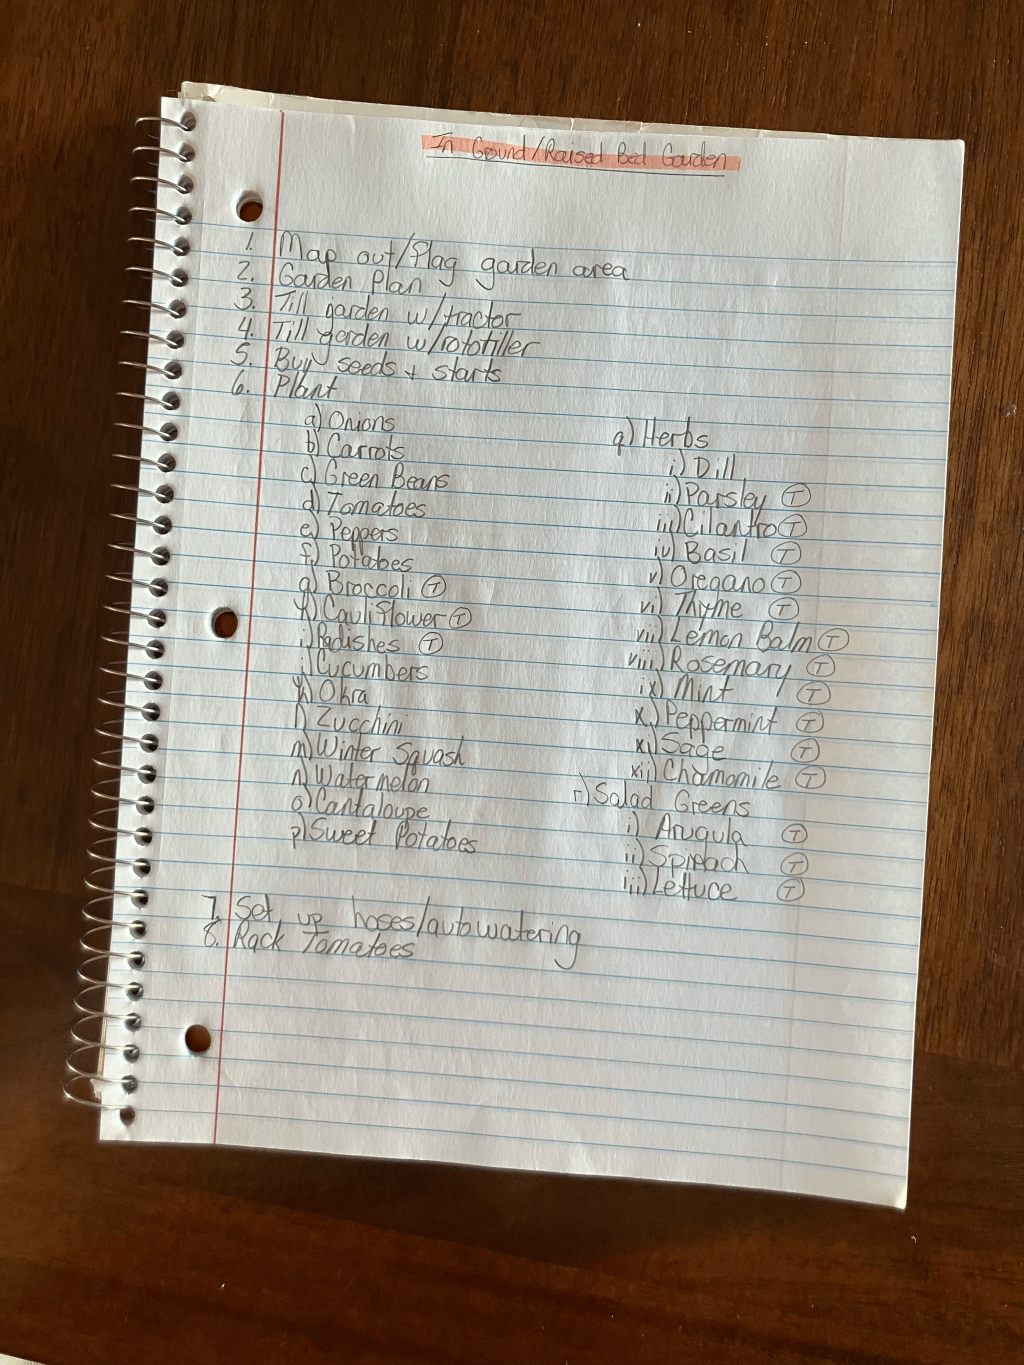
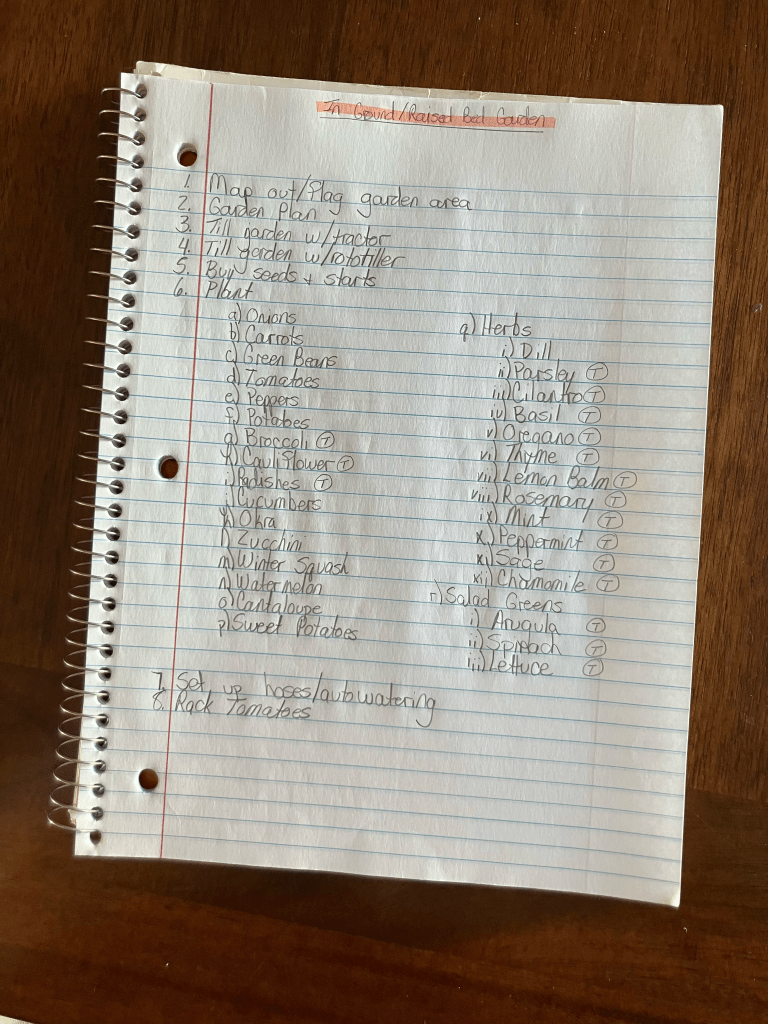
Let’s take the garden mapping and planting for example:
- Map out and flag the garden area
- Garden plan
- Till garden with tractor
- Till garden with rototiller
- Buy seeds and starts
- Plant
- Onions
- Carrots
- Green Beans
- Tomatoes
- Peppers
- Potatoes
- Broccoli
- Cauliflower
- Radishes
- Cucumbers
- Okra
- Zucchini
- Winter Squash
- Watermelon
- Cantaloupe
- Sweet Potatoes
- Herbs
- Dill
- Parsley
- Cilantro
- Basil
- Oregano
- Thyme
- Lemon Balm
- Rosemary
- Mint
- Peppermint
- Sage
- Chamomile
- Salad Greens
- Arugula
- Spinach
- Lettuce
This list was one small line item when I started which was all I needed to remind me that it needed done, but I needed a more detailed plan when it actually came time to tackle the project. If I had put each of these items on our master list, it would have quickly become overwhelming, but by waiting to plan the individual steps I have helped to minimize the overwhelm of having a list with 20 small to-do items that were really part of one bigger item.
Step 6: Start Working and Stay Flexible
Pick one of the your top 2-4 projects and beginning working through the steps!
When you are working on a larger projects, it is not uncommon to run into problems along the way where you have to stop for something unexpected. However, by planning out the project using a brain dump, you can eliminate issues like waiting on supplies because you didn’t order them or getting hung up needing to rent equipment.
In the event that an unforeseen circumstance arises where you do get stopped on a project, simply move on to the next large project rather than sitting and waiting. That is another perk of the brain dump list: you should never be sitting unsure of what the next steps are or unsure of what you can do next. You have a roadmap for not just your current project but your next one as well!
Benefits of the Brain Dump Strategy
Using this strategy has been a complete game-changer for my husband and I. It has helped:
- Clear Mental Clutter: Frees the mind to focus on the task that is at hand rather than chasing down a million different ideas.
- Boost Productivity: Provides a roadmap for what is next so that we are never left unsure of what to do.
- Encourage Creativity: Allows wild ideas without immediate judgement.
For us, our master list for the new property is a living document that we regularly adjust by crossing off completed projects and adding new ideas, but I use the same strategy for lots of different areas of my life!
Have you ever used the brain dump strategy to help you focus on the things that need done? If so, let me know in the comments!

Leave a comment